
Quick Answer: Proper UFH design requires a heat loss calculation (typically 60–120 W/m² for UK homes), appropriate pipe spacing (100–300mm depending on insulation quality), and strategic zoning (separate controls for living, sleeping, and bathroom areas). Flow temperatures should be 35–45°C for efficiency. Poor design = cold rooms and wasted money; professional design services cost £200–500 but ensure optimal performance.
UFH Design & Planning: Heat Loss Calculations and System Layout
Proper design and planning is the most critical stage for a successful underfloor heating installation. Getting the design right from the start ensures optimal comfort, energy efficiency, and system longevity, while avoiding costly mistakes that can plague the system for decades.
A well-designed system provides even heat distribution, minimises running costs, and works seamlessly with your heat source (boiler or heat pump). A poorly designed system might never reach target temperatures, cost significantly more to run, or create uncomfortable hot and cold spots.
This comprehensive guide covers the essential design principles for any UFH project, from single-room electric installations to whole-house wet systems.

New to underfloor heating? Start with our beginner’s guide → to understand the basics first.
Why Design Matters: The Cost of Getting It Wrong
UFH design is not something to guess at or rush. The consequences of poor design are significant and long-lasting:
Under-Specification Results In:
- Cold rooms that never reach comfortable temperatures
- Extended heat-up times (6+ hours instead of 2-3 hours)
- Heat pump inefficiency if flow temperature must be raised to compensate
- Comfort complaints and dissatisfaction with the system
- Expensive remedial work to increase pipe density or replace components
Over-Specification Results In:
- Wasted money on unnecessary materials and installation labour
- Higher initial costs (£500-2,000+ extra for whole-house systems)
- Potential overheating if controls aren’t sophisticated enough
- Reduced system lifespan from thermal stress
Correct Design Delivers:
✅ Optimal comfort with even heat distribution ✅ Lowest running costs through efficient operation ✅ Maximum heat pump efficiency (COP 3.0–3.5 at low flow temperatures) ✅ Long system lifespan (25-50+ years) ✅ Compliance with Building Regulations Part L ✅ Predictable performance matching design specifications
The design stage typically costs £200-500 for professional services but can save thousands in avoided mistakes and optimised running costs.
Understanding Heat Loss Calculations
Before you can design a heating system, you must understand how much heat a room loses. This is the single most important calculation in UFH design.
What is Heat Loss?
Heat loss is the rate at which heat escapes from a space, measured in Watts (W) or Watts per square metre (W/m²). Heat escapes through:
- Walls (30-40% of total heat loss in typical UK homes)
- Roof/ceiling (20-30%)
- Windows and doors (15-25%)
- Floor (10-15% if uninsulated)
- Ventilation and air leakage (10-20%)
The heat loss calculation determines how much heat your UFH system must generate to maintain comfortable temperatures on the coldest days.
Why Heat Loss Calculation Matters
A heat loss calculation determines:
- The required heat output (in Watts per square metre, W/m²)
- The necessary pipe spacing or cable density
- The system’s operating flow temperature
- The potential energy consumption and running costs
- Heat source sizing (boiler or heat pump capacity)
Getting this wrong can lead to an undersized system that never gets warm enough, or an oversized system that is inefficient and expensive to run.
For detailed information on running costs and how design choices affect your energy bills, see our Underfloor Heating Running Costs 2026 Guide.
Typical UK Heat Loss Values
Heat loss varies dramatically based on property age, insulation levels, and construction quality:
| Property Type | Typical Heat Loss (W/m²) |
|---|---|
| Modern new build (post-2010, excellent insulation) | 60–80 W/m² |
| Well-insulated home (2000s, good double glazing) | 70–90 W/m² |
| Average 1980s-1990s home (basic insulation) | 80–100 W/m² |
| Older property (pre-1980, poor insulation) | 90–120 W/m² |
| Period property (single glazing, solid walls) | 120–150+ W/m² |
| Conservatory or extension (large glazed area) | 150–200+ W/m² |
Important: These are rough guides only. A room-by-room professional heat loss calculation is always recommended for accuracy, accounting for:
- Window sizes and orientation
- External wall area
- Ceiling height
- Number of external walls
- Insulation quality and thickness
- Air change rate (ventilation and draughts)
How to Get a Heat Loss Calculation
Option 1: Professional Surveyor (£200–500) A qualified heating engineer or surveyor will:
- Visit your property and measure each room
- Record construction details (wall types, window sizes, insulation)
- Use industry-standard software to calculate room-by-room heat loss
- Provide a detailed report with recommendations
Option 2: MCS-Accredited Heat Pump Installer (Often Free) If you’re installing a heat pump, MCS-accredited installers must perform heat loss calculations as part of their design process. This is often included in their quotation.
Option 3: DIY Using Online Calculators (Free, Less Accurate) Basic online calculators can provide rough estimates but lack the accuracy of professional assessments. Use only for initial planning, not final design.
Heat Loss and UFH Suitability
UFH can comfortably provide up to 100 W/m² with 35-45°C flow temperatures. Beyond this:
- 100-120 W/m²: Possible with closer pipe spacing (100-150mm) and higher flow temperatures (45-50°C)
- 120+ W/m²: UFH alone may not suffice; supplementary radiators or heat loss reduction (insulation upgrades) recommended
For properties with very high heat loss, consider improving insulation before installing UFH — it’s usually more cost-effective long-term.
Pipe Spacing: The Key to Output Control
For wet UFH systems, pipe spacing is the primary method of controlling heat output per square metre.
How Pipe Spacing Works
The closer together pipes are laid, the more evenly heat is distributed and the higher the output. Standard spacing options:
| Pipe Spacing | Heat Output | Best For | Pipe Required per m² |
|---|---|---|---|
| 100mm centres | 90-110 W/m² | High heat loss areas, conservatories, poorly insulated rooms | 10 linear metres |
| 150mm centres | 70-90 W/m² | Average UK homes, moderate insulation | 6.7 linear metres |
| 200mm centres | 60-80 W/m² | Well-insulated modern homes, new builds | 5 linear metres |
| 250mm centres | 50-70 W/m² | Excellent insulation, passive house standards | 4 linear metres |
| 300mm centres | 40-60 W/m² | Very low heat loss, supplementary heating | 3.3 linear metres |
Standard spacing for most UK homes: 200mm centres in living areas, 150mm in bathrooms and poorly insulated rooms, 100mm in conservatories.
Why Pipe Spacing Matters
Too close (over-specification):
- Wastes money on unnecessary pipe (£1-2/m extra × floor area)
- Increases installation labour time and cost
- Creates denser pipe networks harder to install
Too wide (under-specification):
- Insufficient heat output on cold days
- Visible “striping” effect with warm and cool bands across the floor
- System never achieves target room temperature
- Higher flow temperatures required to compensate (reduces heat pump efficiency)
Adjusting Spacing for Room Variations
Even within the same property, different rooms may require different pipe spacing:
- Bathrooms: Often use 150mm spacing for higher output (prefer 22-24°C room temperature)
- Living rooms: Standard 200mm spacing for 18-21°C
- Bedrooms: 200-250mm spacing for 16-18°C
- Kitchens: 200mm spacing accounting for heat from appliances
- Conservatories: 100-150mm spacing due to large glazed area and heat loss
- North-facing rooms: 150-200mm spacing (less solar gain, higher heat loss)
- South-facing rooms: 200-250mm spacing (benefit from solar gain)
Need help calculating the right spacing for your project? Use our free pipe spacing calculator to get instant recommendations based on your room specifications, heat loss, and heat source.
Flow Temperature Selection
Flow temperature is the temperature of water circulating through your UFH pipes. It’s critical for both comfort and efficiency.
Standard Flow Temperatures
- 35-40°C: Ideal for heat pumps (maximises COP 3.5+), very efficient
- 40-45°C: Standard for well-insulated homes with gas boilers
- 45-50°C: For older properties with higher heat loss
- 50-55°C: Maximum for UFH; approaching radiator territory
Important: Building Regulations Part L (2021) encourages low-temperature heating systems. Flow temperatures above 55°C should be avoided for UFH as they reduce efficiency and can damage some floor coverings.
Why Flow Temperature Matters
Lower flow temperatures (35-40°C): ✅ Maximum heat pump efficiency (COP 3.0-3.5) ✅ Lower energy consumption and running costs ✅ Gentle, even heat distribution ✅ Suitable for all floor types including timber ✅ Longer system lifespan (less thermal stress)
Higher flow temperatures (45-55°C): ❌ Reduced heat pump efficiency (COP drops to 2.0-2.5) ❌ Higher running costs (15-30% increase) ❌ Risk of overheating floor surfaces ❌ Not suitable for engineered wood or laminate ❌ Greater thermal expansion stress on components
Balancing Flow Temperature and Pipe Spacing
If heat loss calculations suggest you need high output:
Option A: Closer pipe spacing + low flow temperature
- Better for heat pumps and efficiency
- Higher pipe material costs
- Superior long-term performance
Option B: Standard pipe spacing + higher flow temperature
- Lower initial material costs
- Higher running costs over system lifespan
- Reduces heat pump efficiency
Recommendation: Always prefer closer pipe spacing over higher flow temperatures for long-term efficiency and heat pump compatibility.
For heat pump-specific design considerations, see our Underfloor Heating with Heat Pumps Guide.
Zoning Strategy: Room-by-Room Control
Zoning allows you to control the temperature of different areas independently, which is key to both comfort and efficiency.
Why Zone Your UFH System?
Comfort benefits:
- Different rooms need different temperatures (bathroom 22-24°C vs bedroom 16-18°C)
- Occupancy patterns vary (bedrooms only heated evenings, living room during day)
- Personal preferences differ (some like it warmer/cooler)
Efficiency benefits:
- Heat only the rooms you’re using (20-30% energy savings)
- Prevent overheating of rooms that don’t need heating
- Tailor temperatures to usage patterns
- Reduce wasted energy in unoccupied spaces
Typical Zoning Approach
Create separate zones for areas with different heating needs:
| Zone Type | Target Temperature | Operating Hours | Example Rooms |
|---|---|---|---|
| Living areas | 18-21°C | 7am-11pm | Living room, dining room, kitchen |
| Bedrooms | 16-18°C | 6pm-7am | All bedrooms |
| Bathrooms | 22-24°C | Morning 6-9am, evening 6-10pm | Ensuite, main bathroom |
| Utility/hallways | 15-17°C | As needed | Hallways, utility room |
| Home office | 19-21°C | 8am-6pm weekdays | Study, office |

How Many Zones Do You Need?
Minimum zoning (basic comfort):
- 1 zone per floor (upstairs/downstairs)
- Suitable for very small properties or tight budgets
- Limited control and efficiency
Standard zoning (recommended for most homes):
- Living areas: 1 zone
- Bedrooms: 1-2 zones (master separate from other bedrooms)
- Bathrooms: 1 zone (or combined with bedrooms if timing aligns)
- Total: 3-5 zones for typical 3-4 bedroom house
Advanced zoning (maximum control):
- 1 zone per room
- Ideal for large homes or varying occupancy
- Maximum efficiency and comfort
- Higher installation costs (more manifold ports, thermostats, wiring)
Manifold Sizing and Multiple Manifolds
Each zone requires one manifold port (flow and return). Standard manifolds come in:
- 2-port
- 4-port
- 6-port
- 8-port
- 10-port
- 12-port
When to use multiple manifolds:
- Properties with more zones than manifold capacity
- Multi-storey buildings (1 manifold per floor)
- Very large floor areas (long pipe runs reduce efficiency)
- Extensions or annexes distant from main manifold
Multiple manifolds add cost (£200-400 per additional manifold plus installation) but improve system performance in large properties.
For comprehensive manifold selection and setup guidance, see our Underfloor Heating Manifold Guide.
For detailed zoning strategies and control options, see our Underfloor Heating Zoning Complete Guide.
Floor Build-Up Considerations
The floor construction significantly impacts UFH design, installation cost, and system performance.
Screed Depth for Wet Systems
Traditional sand/cement screed:
- Minimum depth over pipes: 65-75mm
- Provides thermal mass for even heat retention
- Adds significant floor height (pipes + screed = 85-95mm total)
- Long cure time (1mm per day = 65-75 days before final flooring)
Liquid screed (anhydrite):
- Minimum depth over pipes: 50-65mm
- Self-levelling for easier application
- Better thermal conductivity than sand/cement
- Faster cure time (typically 28-35 days)
- 20-30% more expensive than traditional screed
Floor height comparison:
- Insulation: 25-100mm
- Pipe: 16-20mm
- Screed: 50-75mm
- Total build-up: 100-195mm
For a full breakdown of screed types, minimum depths, drying times, and the commissioning protocol, see our Underfloor Heating Screed Guide.
This is why wet UFH is challenging for retrofits in properties with fixed door heights, staircases, or floor transitions.
Low-Profile Systems for Retrofit
When floor height is limited:
Low-profile overlay boards (20-30mm total):
- Grooved boards with channels for pipes
- Dry installation (no wet screed)
- Suitable where only 20-30mm height available
- More expensive (£30-50/m² for boards)
- Faster installation (no cure time)
Suspended floor systems:
- Pipes run between floor joists from below
- Zero floor height increase
- Requires accessible void below
- Insulation fitted between joists
- Ideal for ground floors with accessible underside
For retrofit-specific design considerations and low-profile solutions, see our Retrofitting Underfloor Heating Guide.
Insulation Requirements
Insulation is not optional — it’s essential for efficiency and Building Regulations compliance.
Ground floors (over earth or unheated void):
- Minimum: 100mm rigid foam insulation (PIR/XPS)
- Recommended: 150mm for maximum efficiency
- Placed directly on structural base before pipes
Upper floors (over heated rooms below):
- Minimum: 25mm acoustic/thermal insulation
- Purpose: Reduce heat loss downwards (still costs money even if heating room below)
- Improves sound insulation between floors
Edge insulation:
- 10-20mm perimeter strip around all room edges
- Prevents heat escaping sideways into walls
- Allows thermal expansion of screed
- Essential but often forgotten in poor installations
Without adequate insulation:
- 30-50% heat loss downwards
- Significantly higher running costs
- Longer heat-up times
- Reduced system efficiency
- Potential Building Regulations non-compliance
Thermostat Placement and Control Strategy
Where you place thermostats significantly impacts comfort and efficiency.
Thermostat Location Guidelines
Air temperature sensors:
- 1.5m from floor level
- Interior wall (never exterior wall which is colder)
- Away from direct sunlight, draughts, radiators
- Away from heat-generating equipment (TVs, computers, lamps)
- Representative of average room temperature
Floor temperature sensors:
- Embedded in floor between two pipe runs (centre of heated area)
- Protected by conduit for future replacement
- Used as limit sensor (prevents floor overheating)
- Essential for timber floors (limit to 27°C)
Air vs Floor Sensors vs Combined
| Sensor Type | Purpose | Advantages | Limitations |
|---|---|---|---|
| Air sensor only | Maintains room air temperature | Accurate comfort control | Doesn’t protect floor from overheating |
| Floor sensor only | Maintains floor temperature | Prevents floor damage | Room temperature can vary |
| Combined (air + floor limit) | Air temp control, floor protection | Best of both worlds | Slightly more expensive (£20-40) |
Recommendation: Use combined air + floor sensors for all installations, especially with timber flooring.
For smart thermostat options with remote control and scheduling, see our Smart Thermostats for Underfloor Heating Guide.
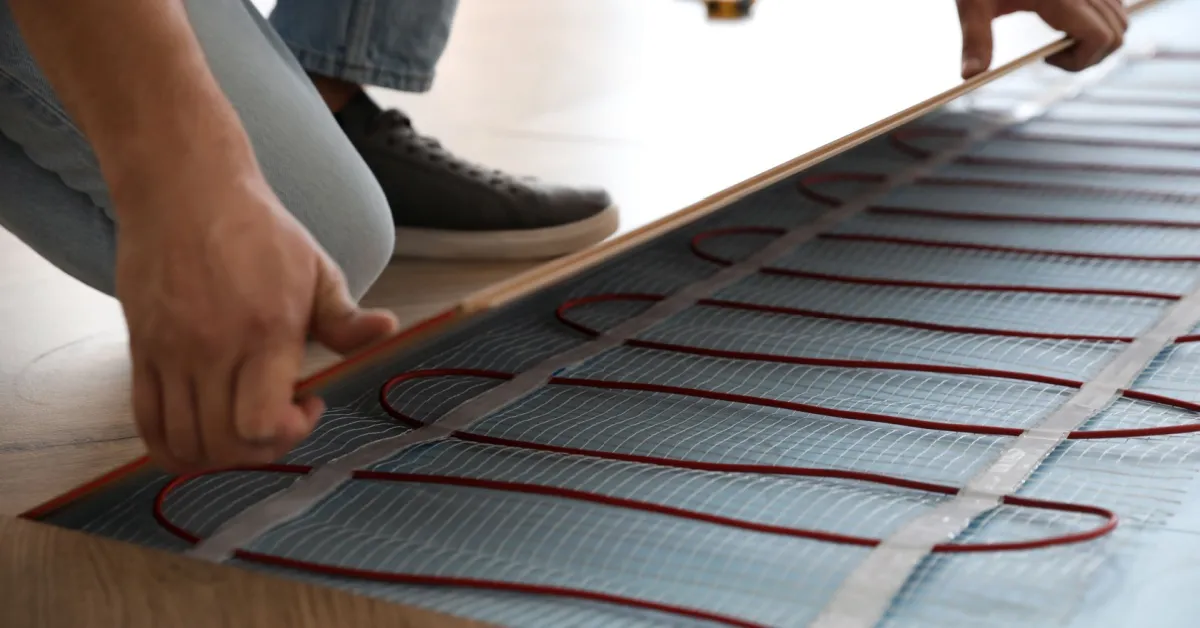
Water System Design Details: Pipe Layout Patterns
There are two main patterns for laying pipes:
1. Spiral (or Snail) Pattern ⭐ Recommended
How it works:
- Flow and return pipes run alongside each other throughout
- Creates most even heat distribution
- Warmer flow pipe compensates for cooling return pipe
Advantages:
- Even temperature across entire floor (no hot/cold spots)
- Lower flow temperature required (better efficiency)
- Ideal for large open-plan areas
- Professional appearance
Disadvantages:
- Slightly more complex to plan
- Requires more skill to lay correctly
Best for: Living rooms, open-plan areas, high-specification installations.
2. Serpentine (or Zig-Zag) Pattern
How it works:
- Single continuous pipe runs back and forth across room
- Water gradually cools from start to end of loop
Advantages:
- Simple to plan and lay
- Easier for DIY installations
- Works well for narrow rooms (hallways)
Disadvantages:
- Temperature variation from hot to cool end
- May create warm/cool zones in large rooms
- Requires slightly higher flow temperature
Best for: Bathrooms, narrow hallways, small rooms, DIY projects.

Loop Lengths
Maximum loop length depends on pipe diameter:
- 16mm pipe: 80-100m maximum per loop
- 20mm pipe: 100-120m maximum per loop
Exceeding maximum length increases pressure drop, reducing flow rate and system efficiency. Large rooms may require multiple loops.
Manifold Planning
The manifold is the central hub for a wet system. It should be located in a central, accessible position (like a utility cupboard). You will need one port on the manifold for each pipe loop (zone).
Manifold location criteria:
- Central to all zones (minimises pipe run lengths)
- Easily accessible for maintenance and adjustment
- Protected from damage (cupboard or boxed enclosure)
- Well-ventilated (prevents condensation)
- Near heat source (boiler/heat pump) where possible

Check out our Underfloor Heating Manifold Guide for setup, balancing, and troubleshooting.
Electric System Design
Design for electric systems is simpler than wet systems but still requires careful planning.
Power Output Selection
Electric UFH mats come in standard power outputs:
- 150W/m²: Standard for well-insulated rooms (bathrooms, bedrooms)
- 200W/m²: Higher output for poorly insulated rooms or quick heat-up
Match power output to room heat loss:
- Heat loss 60-80 W/m² → 150W/m² mat sufficient
- Heat loss 80-120 W/m² → 200W/m² mat recommended
System Types
Heating Mats:
- Pre-spaced cables attached to mesh
- Easy to roll out (DIY-friendly)
- Fixed spacing ensures even heat
- Best for square/rectangular rooms
- £35-60/m² materials
Loose Wire Systems:
- Cable on reel, space yourself
- Flexible for awkward shapes
- L-shaped rooms, around fixtures
- Requires more installation skill
- £30-50/m² materials
Foil Systems:
- Ultra-thin (0.5mm) for floating floors
- Laminate, engineered wood
- No screed required
- Quick retrofit installation
- £45-70/m² materials
For comprehensive electric system design, costs, and installation guidance, see our Electric Underfloor Heating Systems UK Guide.
Working with Installers: What to Expect
If you’re hiring a professional installer, a good design package should include:
Essential Design Documentation
-
Room-by-room heat loss calculations
- W/m² for each space
- Total heat requirement
- Assumptions documented (insulation, window types, etc.)
-
System specification
- Pipe spacing for each room
- Loop lengths and quantities
- Manifold sizing and location
- Insulation specification
-
Floor plan drawings
- Pipe layout overlaid on floor plan
- Manifold location
- Thermostat locations
- Exclusion zones (permanent fixtures)
-
Materials list
- Pipe quantities
- Insulation requirements
- Manifold specification
- Control equipment
- Screed volume
-
Cost breakdown
- Materials costs
- Labour costs
- Total project cost
Questions to Ask Installers
✅ “Can you provide a detailed heat loss calculation?” ✅ “What pipe spacing do you recommend and why?” ✅ “What flow temperature will the system operate at?” ✅ “How many zones do you recommend?” ✅ “What is the total floor build-up height?” ✅ “How long until the floor is ready for final covering?” ✅ “What warranty do you provide on installation?” ✅ “Are you registered for Building Control notification?”
Red Flags to Watch For
❌ No heat loss calculation (“we’ll just use 150mm spacing everywhere”) ❌ Unwilling to provide detailed drawings ❌ Vague about flow temperatures ❌ No discussion of zoning strategy ❌ Pressure to choose single zone to save costs ❌ No mention of Building Regulations or certification ❌ Quote significantly cheaper than others (usually means shortcuts)
For cost expectations and what’s included in professional installations, see our Underfloor Heating Costs Guide.
Building Regulations Compliance
UFH design must comply with Building Regulations Part L (England & Wales) covering energy efficiency.
Key requirements:
- Adequate insulation below heating elements
- Programmable controls (minimum)
- Design documentation for Building Control
- MCS certification for heat pump systems (required for grants)
- Energy efficiency calculations (SAP or similar)
For full regulatory guidance, see our UK Building Regulations Underfloor Heating Guide.
Frequently Asked Questions
1. Do I really need a professional heat loss calculation?
For single small rooms (bathroom, ensuite), rough estimates may suffice. For whole-house systems or rooms over 15m², yes — a professional calculation is essential. It costs £200-500 but prevents expensive mistakes. Under-specification means cold rooms; over-specification wastes £500-2,000+ on unnecessary materials. The calculation pays for itself through optimised design.
2. What pipe spacing should I use for a standard UK home?
200mm centres is standard for well-insulated modern homes (post-2000) with heat loss around 60-80 W/m². Use 150mm centres for older properties (1980s-1990s) with heat loss 80-100 W/m², and 100mm centres for very poorly insulated rooms or conservatories with heat loss over 100 W/m². Always base spacing on actual heat loss calculations, not guesswork.
3. How many zones do I need for underfloor heating?
Minimum 3-5 zones for a typical 3-4 bedroom house: living areas (1 zone), bedrooms (1-2 zones), bathrooms (1 zone). Each zone needs one manifold port and one thermostat. More zones = better control and efficiency but higher upfront cost. Single-zone systems save money initially but cost more to run (10-30% higher energy bills) and offer poor comfort control.
4. What flow temperature should I use for underfloor heating?
35-40°C is ideal for heat pumps (maximises COP 3.5+) and well-insulated homes. 40-45°C is standard for gas boilers in average UK homes. Avoid exceeding 50°C — higher temperatures reduce efficiency, increase running costs, and can damage wooden floors. If you need more than 50°C, improve insulation or use closer pipe spacing instead.
5. Can I design and install underfloor heating myself?
Electric systems: Yes, DIYers can lay mats/cables, but Part P certified electrician required for final connections (£150-300). Physical installation is straightforward.
Wet systems: Design requires professional heat loss calculations. Installation is physically demanding (pipe laying, screed work) but possible for competent DIYers. However, pressure testing, manifold setup, and commissioning benefit from professional expertise. Many DIYers do the groundwork and hire professionals for technical commissioning.
6. What’s the minimum floor build-up for wet underfloor heating?
Traditional screed: 100-120mm total (insulation 25-50mm + pipe 16-20mm + screed 65-75mm).
Low-profile systems: 20-30mm using grooved overlay boards (suitable for retrofits with height restrictions).
Floor height is the biggest challenge for wet UFH retrofits. If you have less than 100mm available, consider low-profile systems or electric UFH instead.
7. How long does underfloor heating take to heat up?
Depends on floor construction:
- Electric systems: 30-60 minutes (thin screed, low thermal mass)
- Wet systems with screed: 2-4 hours first time, 1-2 hours for subsequent heating cycles
- Wet systems with overlay boards: 60-90 minutes (lower thermal mass)
Design impacts heat-up time: closer pipe spacing = faster response, but higher cost.
8. What’s the difference between spiral and serpentine pipe layouts?
Spiral pattern: Flow and return pipes run alongside each other, creating the most even heat distribution. Recommended for living rooms and open-plan areas. More complex to lay.
Serpentine pattern: Single pipe snakes back and forth. Simpler to install but creates slight temperature variation from start to end. Suitable for bathrooms, hallways, and small rooms.
For large important rooms, always use spiral pattern for superior comfort.
Conclusion: The Foundation of UFH Success
Thorough design and planning is the foundation of a successful underfloor heating system. Taking the time to calculate heat loss accurately, specify the correct pipe spacing and insulation, and plan your zones strategically will ensure your system provides decades of comfortable, efficient heating.
Key design priorities:
- Accurate heat loss calculation — the foundation of all other decisions
- Appropriate pipe spacing — 100-300mm based on heat loss, not guesswork
- Strategic zoning — 3-5 zones minimum for efficiency and comfort
- Low flow temperatures — 35-45°C for efficiency and heat pump compatibility
- Adequate insulation — 100mm+ ground floors, 25-50mm upper floors
- Professional design service — £200-500 investment that saves thousands
DIY or professional?
- Small electric projects (single bathroom): DIY-friendly with electrician for connections
- Wet systems or multi-room: Professional design essential, installation can be DIY or professional
For any project larger than a single room, we strongly recommend using a professional design service to ensure all calculations are accurate and your system complies with UK Building Regulations.
The design stage is not where you save money — it’s where you ensure the entire investment delivers optimal performance for 25-50 years. Poor design costs far more in wasted energy, comfort issues, and remedial work than professional design services ever could.
For detailed cost expectations including design fees and installation costs, see our Underfloor Heating Costs Guide.
For installation guidance once your design is complete, see our Underfloor Heating Installation Guide.
If you’re experiencing issues with an existing system, poor design may be the root cause — see our Underfloor Heating Problems Guide for diagnostics and solutions.
One useful email,
once a month.
New guides as they go live. Real cost data, not press releases. The occasional rumour from the industry that's actually worth knowing.
No sales pitches. No jargon. Unsubscribe in one click.