Quick Answer
Need professional installation? Find qualified wet UFH installers via the Underfloor Heating Directory.
Underfloor heating typically needs 5 to 10 metres of pipe per square metre, depending on your chosen spacing:
- 200mm spacing (standard for boilers): 5m/m²
- 150mm spacing (recommended for heat pumps): 6.67m/m²
- 100mm spacing (high output/conservatories): 10m/m²
Plus another 5–10m for the pipes connecting to your manifold (we call these "tails").
Introduction: Why Pipe Quantity Matters
When you're planning an underfloor heating system, one of the first things you need to know is: "How much pipe do I actually need per square metre?" It's not just about buying the right length — though that's important. It's about making sure your system can actually heat the room properly.
The amount of pipe you put in the floor affects everything:
- Heat output — Closer spacing means more warmth
- Efficiency — You don't want to over-pipe or under-pipe
- Cost — More pipe means more money on materials
- Circuit design — There's a maximum length each loop can be
In this guide, we'll walk through exactly how to calculate what you need, what factors matter most, and give you real examples you can use for your own project. By the end, you'll know precisely how much pipe to order for any room in the house.
What Is Pipe Spacing, Anyway?
Let's start with the basics. Pipe spacing (or pipe centres) is simply the distance between the centre of one heating pipe and the centre of the next one. It's measured in millimetres, and it's one of the most important decisions you'll make.
Think of it like this: if the pipes are close together (say 100mm apart), you've got more pipe running through each square metre of floor — that means more heat output. If they're further apart (200mm), you use less pipe and get less heat per square metre.
One important note: throughout this guide we're assuming 16mm diameter pipe, which is pretty much the UK standard for wet UFH. If you're using 15mm or 20mm, the pipe-per-m² numbers stay the same, but you'll need to adjust your maximum circuit lengths.
The Three Spacing Options
There are three main spacing choices in the UK, each with its own strengths.
100mm — Maximum Output
| What you get | Value | |--------------|-------| | Pipe per m² | ~10 metres | | Heat output | 75–110 W/m² | | Best for | Conservatories, draughty rooms, high heat loss | | Typical use | Large windows, single glazing, fast warm-up needed |
100mm spacing gives you the most heat because you're packing the floor with pipe. It's perfect for rooms that lose a lot of heat or where you want the floor to respond quickly. The downside? You need a lot more pipe, and you might hit circuit length limits.
150mm — The Sweet Spot
| What you get | Value | |--------------|-------| | Pipe per m² | ~6.67 metres | | Heat output | 60–85 W/m² | | Best for | Well-insulated homes, bathrooms, heat pumps | | Typical use | The go-to for heat pumps; good value for money |
150mm is what most UK homes use. It's comfortable, reasonably efficient, and doesn't break the bank on materials. If you've got a heat pump (which runs cooler than a boiler), 150mm is usually the minimum you should look at.
200mm — Most Economical
| What you get | Value | |--------------|-------| | Pipe per m² | 5 metres | | Heat output | 45–65 W/m² | | Best for | New builds, good insulation, bedrooms, living rooms | | Typical use | Standard gas or oil boilers running at 45–50°C |
200mm uses the least pipe, but it also delivers the least heat. It works fine in modern, well-insulated properties — especially when paired with a conventional boiler that can run hotter.
How to Calculate What You Need (The Right Way)
You might be thinking: "Just multiply the room area by the multiplier, right?" Well, yes — but that's only the start. A proper calculation needs to include three things:
- Base pipe length — area × your spacing multiplier
- Manifold tails — the feed and return pipes that connect the loop to the manifold
- Wastage — about 5% for cuts, mistakes, bent sections
Let's go step by step.
Step 1: Base Pipe Length
Take your room area and multiply by the right number:
- 100mm spacing: area × 10
- 150mm spacing: area × 6.67
- 200mm spacing: area × 5
Example: A 20m² living room with 150mm spacing: 20 × 6.67 = 133.4m of base pipe
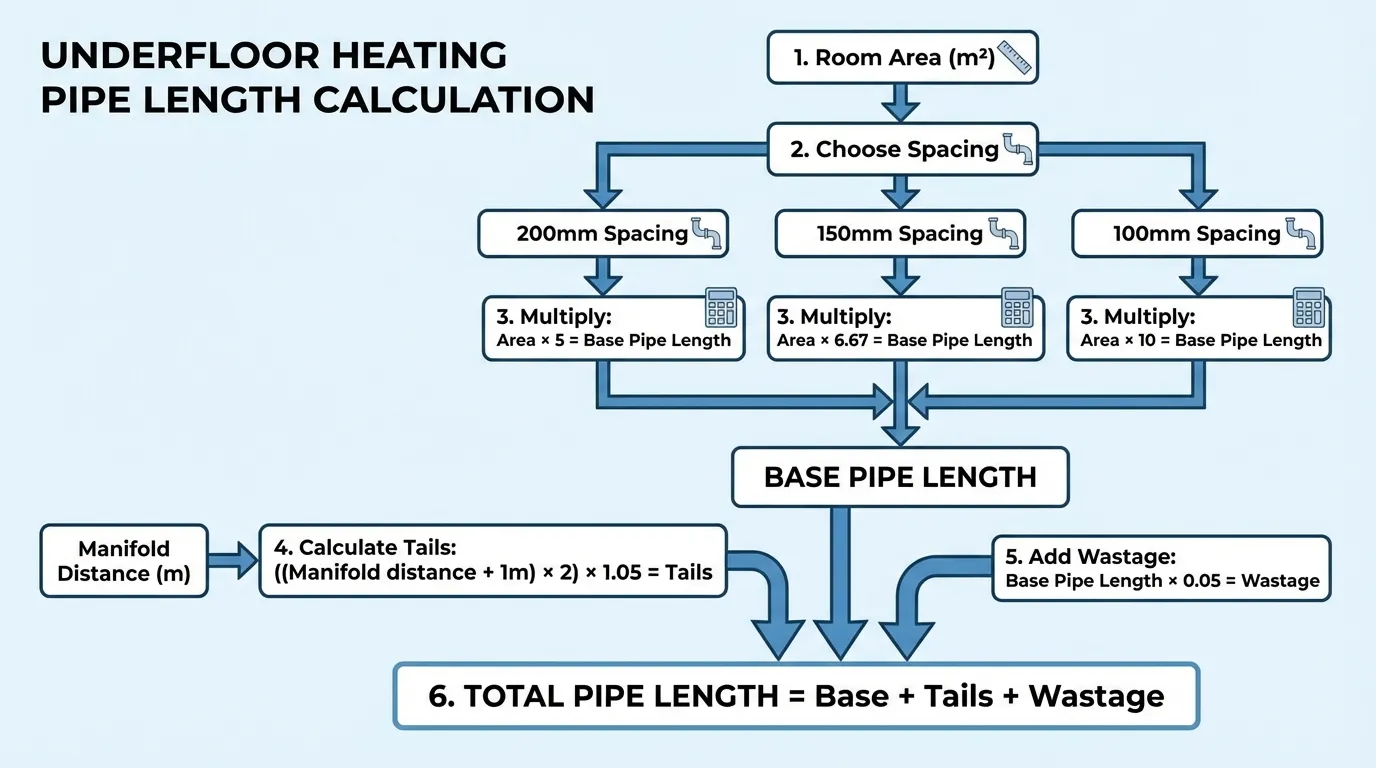
Step 2: Add the Tails
The pipe doesn't just lie in loops on the floor. You also need feed and return pipes running to and from the manifold. Account for:
- How far the manifold is from the room
- 1 metre up the wall to reach the manifold connections
- Both flow and return (so multiply by 2)
- About 5% extra for bends and fittings
Formula: ((manifold distance + 1m) × 2) × 1.05 = tails length
Example: Manifold is 5m away: ((5 + 1) × 2) × 1.05 = 12.6m
Step 3: Add Wastage
Things go wrong — you cut a length too short, a section gets kinked, you need an extra bend. Standard practice is to add 5% to cover this.
Formula: base pipe length × 0.05 = wastage
Example: 133.4m × 0.05 = 6.7m
Step 4: Total It Up
Total pipe = base pipe + tails + wastage
Example: 133.4 + 12.6 + 6.7 = 153m
You'd need to buy a 160m coil (or the equivalent in smaller lengths) of 16mm PERT-AL-PERT pipe.
Pro tip: Always round up. Running out of pipe halfway through the job is nobody's idea of fun.
What Actually Affects Your Spacing Choice?
Choosing spacing isn't just about picking a number from a table. You need to think about your specific situation.
Heat Loss Matters
If the room loses heat quickly — think large single-glazed windows, poor insulation, exterior walls — you'll need closer spacing to keep it warm. When in doubt, go closer or get a proper heat loss calculation done.
Boiler or Heat Pump? That's Key
This is often the deciding factor:
- Boilers run at 45–50°C, returning at 30–35°C. The hot water carries more energy, so you can get away with wider spacing (200mm).
- Heat pumps are happiest at 35–40°C flow, returning around 30°C. Cooler water means each metre of pipe delivers less heat, so you need more pipe per m² — typically 150mm minimum, sometimes 100mm in tricky rooms.
If you're going with a heat pump, start at 150mm and only widen to 200mm after confirming (via heat loss calc) that the output will be sufficient.
What's Your Floor Covering?
Different finishes affect how much heat reaches the room:
- Tile & stone conduct heat well — standard spacing usually fine
- Carpet acts as insulation, reducing output — you might need closer spacing
- Timber has a maximum floor temperature of 27°C to prevent drying out — make sure your spacing can hit the required output at that limit
Always check with the floor manufacturer that their product is suitable for underfloor heating and what temperature limits apply.
Room by Room
Bathrooms often get 150mm spacing — they're small, tiled (high heat loss), and people want them warm quickly. Bedrooms and living rooms can usually manage with 200mm, especially if the house is well insulated.
Circuit Length: Don't Overdo It
For 16mm PERT-AL-PERT pipe, the maximum circuit length is 100 metres. Go longer and you'll get pressure drop — the water at the far end of the loop will be cooler, leading to uneven heating.
If your calculation exceeds 100m, you need to split the room into multiple circuits. For example, a 25m² room at 150mm spacing needs about 167m of base pipe — that's two circuits of roughly 85m each.
Manifold capacity matters too. Most manifolds have between 2 and 12 ports. Plan so each circuit stays under 100m and all your circuits fit the manifold.
Location is another consideration. Keep the manifold as close as possible to the rooms it serves — within 5–10m is a good target. In two-storey homes, it's common to put the manifold in the hallway or under the stairs on the ground floor and run pipes up to the first floor.
Pipe Diameter: What Size Should You Use?
While 16mm is the standard, you might see 15mm or 20mm in some systems.
| Size | Max circuit length | Best for | Things to consider | |------|-------------------|----------|-------------------| | 15mm | 80–90m | Small rooms (bathrooms, WCs) | Easier to bend around obstacles, but short runs limit coverage | | 16mm | 100m | Most homes | Great balance of flow and flexibility; industry standard | | 20mm | 120–140m | Large open-plan areas, commercial | Higher flow rate, less pressure drop, but stiffer and needs gentler bends |
If you use a different diameter, adjust your circuit length limits accordingly — but the pipe-per-m² multipliers stay the same.
Edge Zones: Heating Just the Perimeter
Here's a pro technique: use closer spacing along external walls while keeping standard spacing in the middle of the room. It's called edge zone heating or perimeter heating.
Why bother?
- External walls and windows lose more heat
- Stops cold spots developing near walls
- Makes the room feel more comfortable overall
- More efficient than spacing the whole floor at 150mm
How to do it:
- Perimeter zone: typically 1 metre wide along external walls
- Spacing in edge zone: 100–150mm (depending on insulation)
- Spacing in main area: 150–200mm
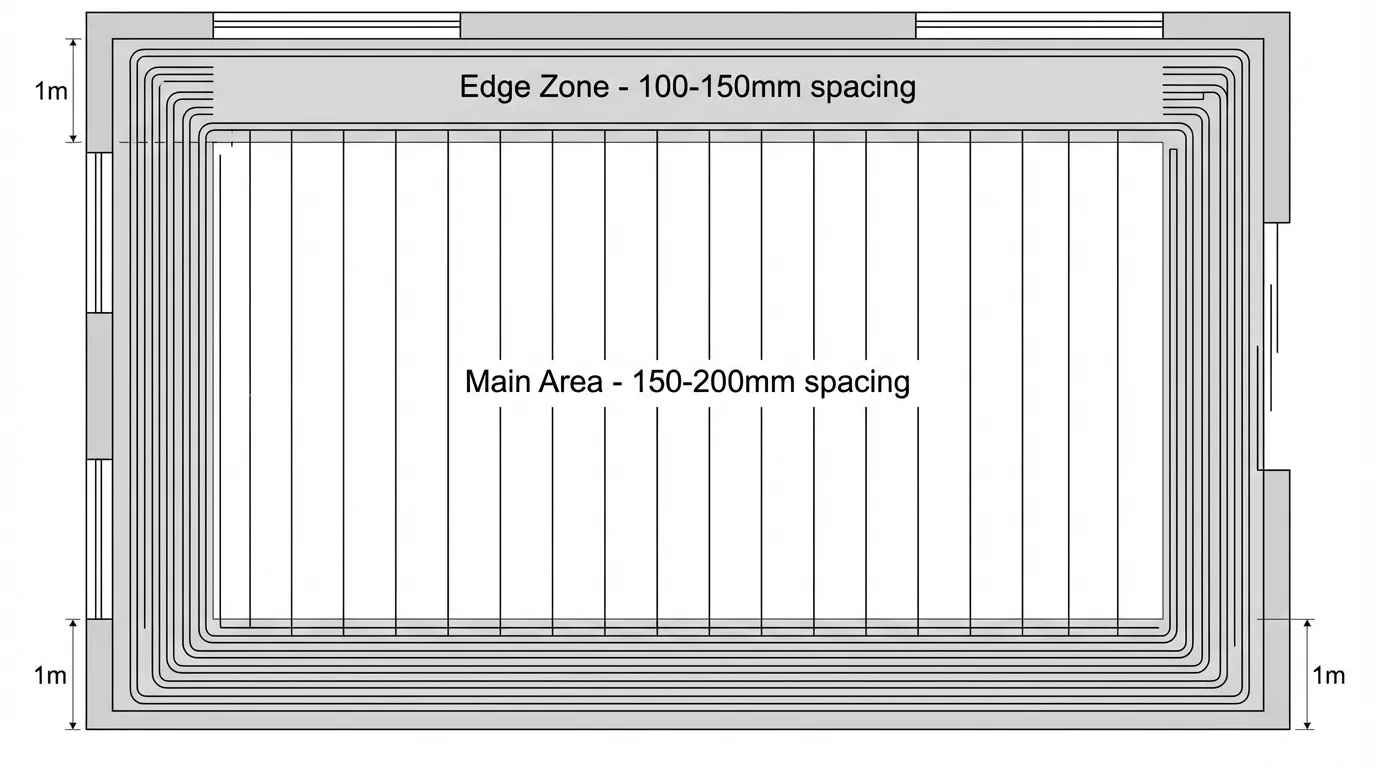
Professional note: Our calculator gives overall spacing recommendations. If you want edge zones, you'll need to adjust manually or talk to an installer who can design a proper layout.
Spiral or Serpentine: Which Layout?
Once you know how much pipe you need, you need to lay it. There are two main patterns.
Spiral (Snail) — The Better Choice
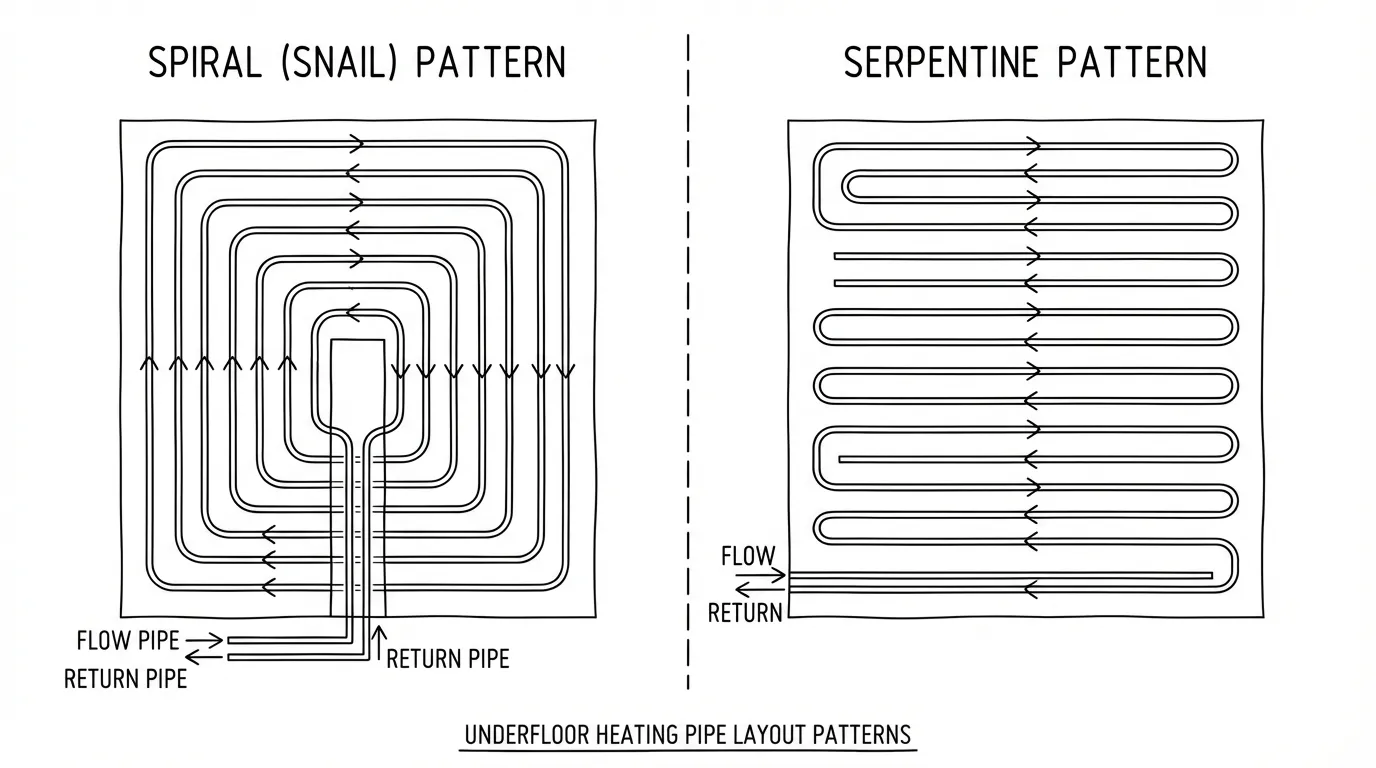
Pros:
- Flow and return pipes run side by side
- Gives even heat across the whole floor
- No hot-to-cold temperature gradient
- Most efficient use of pipe
- Works great in large rooms
Use it when: You want the best comfort and the room shape allows it.
Serpentine (Back-and-Forth) — Simpler
How it works: Pipes run in parallel lines, switching direction at each wall.
Characteristics:
- Easier to install, especially in narrow spaces
- Temperature drops from inlet to outlet (warmer at one end, cooler at the other)
- Can create hot and cold spots in big rooms
- Less efficient than spiral
Use it when: You're working with hallways, corridors, or tight spaces where the pipe has to follow a strict rectangular path.
Dealing with Odd-Shaped Rooms
Not every room is a neat rectangle. Here's how to handle L-shapes, bays, and obstacles.
Split into Rectangles
Break complex shapes into smaller rectangles. Calculate each one separately and add up the pipe lengths. You'll probably need multiple circuits.
Subtract Fixed Objects
If there's a large kitchen island, built-in wardrobe, or other permanent fixture taking up space (over 1m²), subtract that area from your total. No point counting pipe that would go under a solid object.
Add Extra for Awkwardness
Irregular layouts usually need 10–15% more pipe because you can't maintain perfect spacing and have to route around things. Factor that in.
Multiple Circuits for Complex Shapes
Very irregular rooms (L-shapes, lots of protrusions) often work better with several smaller circuits rather than one long, winding loop. This also helps you stay under the 100m circuit limit.
Common Mistakes — And How to Avoid Them
- Forgetting the tails — The manifold connection pipes are easy to overlook. You can end up 10–20m short.
- Circuits too long — Over 100m and you'll get uneven heating and pressure issues.
- One spacing fits all — Different rooms (and even zones) often need different pipe centres.
- No wastage allowance — Always add 5% for cuts, mistakes, damaged sections.
- Ignoring insulation — Poor insulation means you'll need closer spacing to achieve the same comfort.
- Wrong pipe diameter for the job — 15mm might look tidier, but it won't cover a large room in one circuit.
- Exceeding floor temperature limits — Tiles: max 29°C, timber: max 27°C. Go higher and you'll damage the floor.
Real-World Examples
Let's look at three common scenarios.
Example 1: Bathroom with a Heat Pump
Room: 8m² bathroom
Heat source: Air source heat pump
Floor: Tiled, screed
Manifold distance: 3m
Choice: 150mm spacing (good for heat pumps)
- Base pipe: 8 × 6.67 = 53.4m
- Tails: ((3 + 1) × 2) × 1.05 = 8.4m
- Wastage: 53.4 × 0.05 = 2.7m
- Total: 64.5m → buy a 70m coil
Single circuit, no problem with the 100m limit.
Example 2: Open-Plan Kitchen/Living with a Boiler
Room: 35m² open plan
Heat source: Gas boiler
Floor: Oak boards (max 27°C)
Manifold distance: 8m
Choice: 200mm spacing (boiler can run hotter)
- Base pipe: 35 × 5 = 175m → over 100m, so need 2 circuits (about 88m each)
- Tails per circuit: ((8 + 1) × 2) × 1.05 = 18.9m
- Wastage per circuit: 88 × 0.05 = 4.4m
- Total per circuit: ~112m → buy two 120m coils (or one 200m + one 100m)
Example 3: Conservatory — Needs More Heat
Room: 12m² conservatory, single-glazed
Heat source: Boiler (high flow temp)
Manifold distance: 5m
Choice: 100mm spacing (high heat loss)
- Base pipe: 12 × 10 = 120m → need two circuits (60m each)
- Tails per circuit: ((5 + 1) × 2) × 1.05 = 12.6m
- Wastage per circuit: 60 × 0.05 = 3m
- Total per circuit: ~76m → buy two 80m coils
Frequently Asked Questions
What spacing do most people use?
150mm is the most common in the UK — it's a good balance between heat output and cost, and it works with both boilers and heat pumps. But the right choice depends on your specific heat loss, insulation, and heat source.
Can I use different spacings in different rooms?
Yes, absolutely. It's normal to vary spacing room to room. Bathrooms often get 150mm, bedrooms 200mm. Each room has its own circuit on the manifold, so you can set a different spacing for each.
Spiral or serpentine layout — which is better?
Spiral (sometimes called snail pattern) is the better choice for most installations. The flow and return pipes run side by side, giving much more even heat across the floor. Serpentine is simpler to install but you'll get a temperature gradient — warmer near the inlet, cooler at the far end.
What spacing for a heat pump?
Heat pumps typically need 150mm spacing because they run at lower temperatures (35–40°C). In a poorly insulated room or a conservatory, you might need to drop to 100mm. We've got a dedicated heat pump guide that goes into more detail.
Are these calculations accurate?
The methods we've shown are industry-standard and used by professional designers. That said, for larger projects or complex layouts, it's worth getting a qualified installer to do a proper heat loss calculation — they can also optimise the pipe layout for your specific room.
My room isn't a rectangle — what now?
- Break it into rectangular zones and calculate each separately
- Subtract areas taken up by large fixed objects (kitchen islands, built-in wardrobes) over 1m²
- Add 10–15% extra pipe for awkward routing around obstacles
- Very irregular rooms often need multiple circuits anyway
Wrapping Up: Get It Right First Time
Knowing how much pipe you need per square metre is the starting point for a good UFH installation. The basic multipliers — 5m/m², 6.67m/m², 10m/m² — give you a quick answer, but the full calculation with tails and wastage makes sure you order exactly what you need.
Key takeaways:
- Pick spacing based on your heat source, insulation, and room type
- Keep circuits under 100m for 16mm pipe
- Don't forget the tails to the manifold
- Add 5% wastage
- Try our Pipe Spacing Calculator for an instant recommendation
Get the pipe quantity and layout right, and your underfloor heating will keep you warm and comfortable for years.
Next Steps
Ready to move ahead? Here's what to do:
- Use our calculator — Pipe Spacing Calculator — for instant recommendations tailored to your room.
- Work out installation costs with our UFH Cost Calculator.
- Read the Design & Planning Guide to understand heat loss calculations and system sizing.
- Find professional installers via Underfloor Heating Directory — a curated UK-wide list of UFH specialists.
About This Guide
This article is part of the educational content at underfloorheating.info, an independent blog covering underfloor heating systems, installation, and maintenance. We're not tied to any manufacturer — we just want to give you clear, practical advice to help you decide what's right for your home.
Got questions or feedback? Get in touch.
Ready for professional installation? Connect with vetted wet UFH installers through the Underfloor Heating Directory.
One useful email,
once a month.
New guides as they go live. Real cost data, not press releases. The occasional rumour from the industry that's actually worth knowing.
No sales pitches. No jargon. Unsubscribe in one click.