A water underfloor heating layout is more than a set of parallel pipe runs. The pattern has to deliver even heat, fit the room, suit the floor build-up and make every circuit practical to install and balance.
There are several recognised patterns. The right one depends on the room shape, the heat source, the pipe system and the space available for turning the pipe. You should always use the layout and bend rules from the selected pipe and floor-system manufacturer alongside your room design.
If you're working out quantities, our guide to how much underfloor heating pipe per m² you need covers the arithmetic. This guide focuses on the route the pipe takes once you've chosen a sensible spacing and heat output.
The starting point: the design comes first
Pipe layout is part of the wider underfloor heating design and planning process. A designer normally starts with the room's heat loss, floor construction, insulation, floor covering and available flow temperature. Those decisions determine the required heat output and influence the pipe spacing.
That matters because a neat-looking pattern can still be wrong if the floor cannot deliver enough heat. A colder room with large windows may need more pipe or closer centres. A well-insulated room may work with a less dense layout. If the system serves a heat pump, the flow temperature and the pipe system's design data need to be considered before choosing generous spacing.
Don't copy a layout just because it worked in a similar room. Check the room's actual heated area, design temperature and system constraints.
Common pipe layout patterns
Serpentine or meander pattern
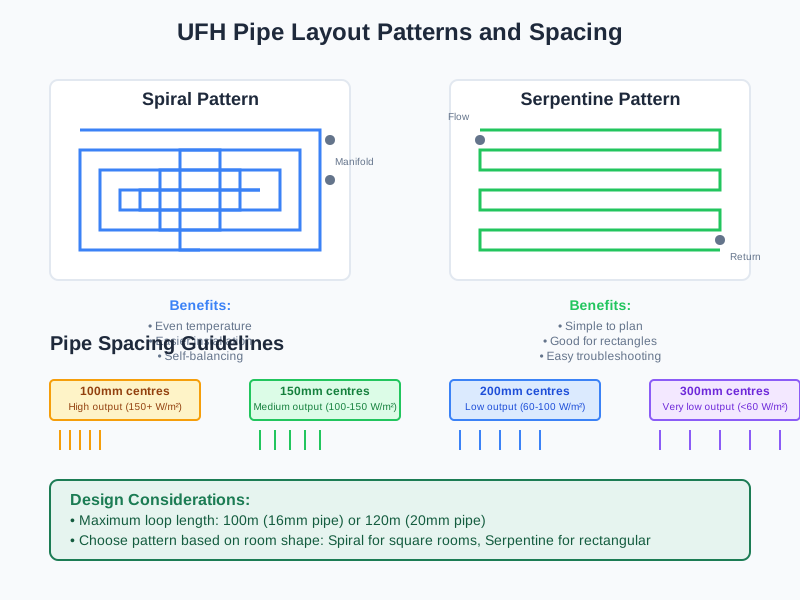
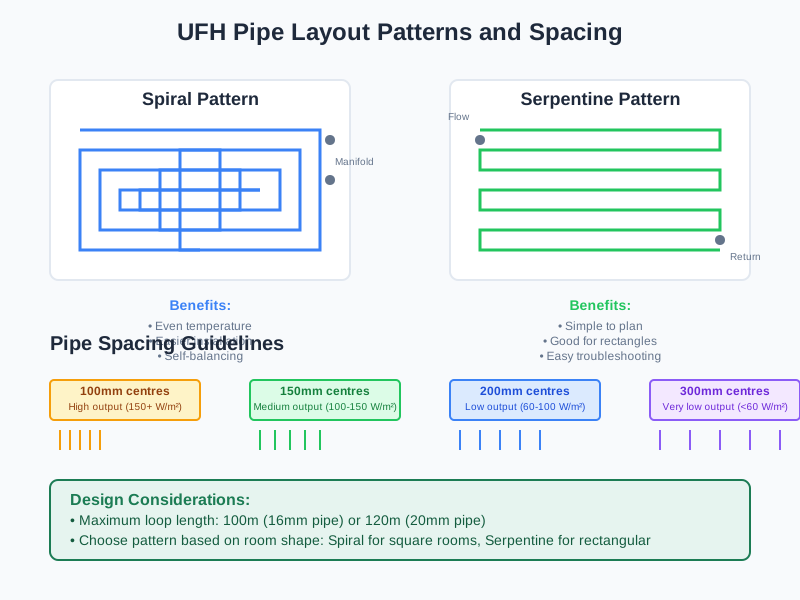
A serpentine layout uses long straight runs connected by alternating 180-degree bends. The pipe travels up and down the room before returning towards the manifold along a planned route.
It's straightforward to set out and easy to understand on a drawing. Long runs can be efficient to install, especially where the room is a simple rectangle. The weak point is the turning area. Each 180-degree bend needs enough space, and a tight or badly supported turn can restrict flow or damage the pipe.
A meander pattern may be adjusted around some obstacles, but changing the route can create uneven spacing. Keep the planned centres consistent wherever practical.
Spiral or bifilar pattern
A spiral pattern starts with a perimeter run and then works inwards. The pipe returns through the centre and then travels back out, filling the gaps between the earlier runs.
This pattern tends to distribute heat more evenly because the flow and return are carried around the perimeter before entering the middle of the room. It also makes it easier to keep consistent pipe centres across the active floor area.
The trade-off is planning. The pipe needs a clear route from the manifold, a neat perimeter and enough room for the return path. A spiral that has to be improvised around a kitchen island, a chimney or a bath can become more complicated than a simple meander.
Some manufacturers recommend a bifilar arrangement specifically because of its temperature distribution. Others allow a different pattern where the design, spacing and floor construction justify it. Follow the design supplied for your system rather than treating a pattern name as a universal rule.
Parallel runs with staggered or offset returns
In a simple rectangular room, the pipe may run in parallel between two perimeter runs. The ends can be connected in a regular sequence, or the returns can be staggered to help manage the available floor area.
This approach is useful when the room has a long, clear direction and the floor edge allows the pipe to turn safely. It is less suitable where doors, partitions, stairs or fixed services make the end returns difficult.
Double-loop or room-within-a-room layouts
A larger area may be divided into two smaller loops. This can help manage circuit length, flow resistance and the pressure drop through the pipe. It can also make balancing easier because each circuit has a more manageable load.
The division has to follow a sensible design. Cutting a room into arbitrary sections can leave an awkward strip with no clear pipe route. A double-loop layout works best when the design identifies two areas with similar heat requirements and suitable return paths.
Spacing and room size
Pipe spacing is the centre-to-centre distance between adjacent runs. It controls how much pipe sits under each square metre and strongly affects the evenness of the floor surface temperature.
The spacing options vary between products, designs and applications. Common residential design bands include:
- Wider spacing, often around 200 to 250mm, where a design has a higher flow temperature and lower heat-loss demand.
- Medium spacing, often around 150 to 200mm, for many conventional residential floor designs.
- Closer spacing, often around 100 to 150mm, where a room has higher heat loss, a colder heat source or a greater need for even surface temperature.
These are general ranges, not installation rules. The selected system may only permit certain spacing values. Some panel systems have fixed channels, while other pipe products use a different grid.
Room size affects the loop length, not just the total area. As a room gets longer, more pipe is needed to complete the circuit and the pressure drop can increase. The room may therefore need a shorter path, a different bend arrangement, additional circuits or a pipe system with a suitable pressure-drop allowance.
This is why the pipe-per-m² guide is only the first calculation. The final circuit includes the floor loop plus the flow and return tails to the manifold.
Perimeter runs and edge zones
Perimeter pipes are often placed near the outside edge of the heated area, particularly beside external walls, doors and large windows. A perimeter run can help cover the part of the room that loses heat quickly and gives the circuit a clear path back towards the manifold.
The exact gap between the pipe and a wall or obstruction is set by the system design and installation instructions. Manufacturers commonly specify a clearance that helps protect the pipe during screeding and avoids concentrating heat in a narrow edge strip. Do not guess this distance from a generic drawing.
A perimeter run also needs to fit around corners and obstacles. In an L-shaped room, the outer corner can be awkward because the pipe has to turn while remaining part of the active heating zone. In a room with a fixed bath, the layout may have to omit an area or use a different route.
Plan the heated area before the screed is ordered. Fixed furniture, kitchen units, bath positions and wall build-ups can all affect where the pipe can go.
Bends matter
The bend radius is part of the pipe system's design. A 180-degree turn in a floor loop is usually made with a smooth bend rather than a sharp kink. The pipe should lie naturally without being pulled too tight, and the turn should remain within the space allocated for it.
The manufacturer's minimum bend radius is not a decorative detail. A tight bend can increase pressure loss, reduce the usable area of the turn or create a stress point in the pipe. Different pipe diameters and materials have different limits.
A loop may use a return bend at the end of each run, while a spiral uses a controlled reversal near the centre. Both need a route for the pipe to leave the floor and rise to the manifold. The tails should be supported and protected, and any penetrations through walls or floors should be sleeved or formed as required by the installation system.
Before laying pipe, mark the planned route on the floor and check the turn points. It is much easier to move a marker than to move a pipe after screed or screed-compatible boards are installed.
Pipe diameter and circuit length
Residential wet UFH commonly uses pipe in the 16mm size class, but a project may use another diameter. Diameter affects flexibility, pressure drop, flow capacity and the maximum practical circuit length. A larger pipe can reduce pressure drop over a long route, but it is less flexible and may make tight turns harder to install.
The pipe's nominal outside diameter and wall thickness matter, as does the bore size. Two pipes labelled 16mm may not behave identically if their internal dimensions differ. The pipe system manufacturer, not the installer, should provide the relevant pressure-drop and circuit-length information.
Don't choose the diameter by looking at the number of metres in the room alone. The design has to consider the heat source, flow temperature, pump, manifold connections, floor construction and pressure budget. If the loop is too restrictive, the pump may need to work harder, become noisy or fail to deliver the designed flow.
Manifold circuits and how the layout connects to them
Each floor circuit normally connects to its own flow and return pair on the manifold. The number of circuits is a design decision, not simply the number of rooms. One room may need two circuits, while an open-plan area may be treated as one larger zone if the heat loss and flow path allow it.
A manifold guide explains the flow bar, return bar, flow meters and actuators. On the layout drawing, mark every circuit clearly. Include the room, circuit number, flow direction, approximate length and the intended supply and return connections.
Keep the manifold tails organised and avoid congestion around the manifold. A tidy arrangement is easier to commission, balance and service. It also reduces the chance of connecting the wrong return or accidentally creating a sharp bend at the wall.
The longest circuit may need more flow or a different route than a short bathroom loop. Balancing exists to make the connected circuits work together, not to compensate for a layout that was never checked for pressure drop.
Avoiding crossings and awkward obstacles
Pipes should not cross over one another in the floor. Crossing creates unnecessary local congestion and makes the route harder to inspect or install cleanly. Plan the feed and return routes before fixing any clips or panels.
Use a clear planning process:
- Mark the room perimeter, walls, doors, windows, services and fixed furniture.
- Mark the manifold location and plan the shortest sensible route for each tail.
- Draw the main pipe direction, usually along the longest useful dimension where the design allows.
- Add perimeter and edge runs before filling the main floor area.
- Place bends and check them against the pipe's bend-radius requirements.
- Divide the room into circuits only where the resulting lengths and flow rates make sense.
- Check the finished drawing against the heat loss, floor build-up and manufacturer requirements.
Where a room has a complicated outline, ask the designer to show the exact route. A sketch that appears to fit on paper may leave no space for a proper 180-degree turn. Likewise, avoid crossing over floor boxes, drainage zones, threshold details or areas where a later floor finish will be cut back.
The main design tradeoffs
Every layout balances several things:
- Even heat: More pipe and closer centres can improve distribution, but the design still needs adequate flow and suitable pipe.
- Installability: Straight runs are easy, while spirals and perimeter turns need careful setting out.
- Circuit length: Shorter circuits can reduce pressure drop, but splitting a zone adds connections and balancing work.
- Heat source temperature: Lower-temperature systems may need a denser layout or a different pipe system.
- Room use: Built-in units, baths, stairs and furniture can make an active floor area smaller than the room's simple floor area.
- Future flexibility: A regular layout is usually easier to repair or modify than a route full of improvised detours.
The best pattern is the one that meets the design and can be installed cleanly. A more complex pattern isn't better if it creates excessive bends, difficult access or unnecessary pressure loss.
How to check a proposed layout
Before approving a layout, ask these questions:
- Does the pipe spacing match the heat-loss and heat-output design?
- Is the pipe route shown all the way to and from the manifold?
- Are the bends within the pipe manufacturer's requirements?
- Do any pipes cross or pass through an unsuitable obstruction?
- Are the circuit lengths and pressure losses known?
- Is the perimeter treatment suitable for the external walls?
- Does the drawing account for the floor build-up, insulation and final covering?
- Can the installer fix and support the pipe without forcing it?
- Are all circuits labelled and measurable after installation?
If the answer to any of these is unclear, the drawing is not ready for installation. A design change made before the floor is closed is usually far less disruptive than moving pipe later.
A practical rule of thumb
Keep the main runs long and straight where the room allows. Choose the spacing that meets the heat-loss calculation, not the pattern that looks most attractive. Reserve space for smooth bends and for the flow and return tails. Then check the complete route, including the manifold connections.
Our wet underfloor heating guide explains the wider system, including screed systems, low-temperature operation and heat source compatibility. Pair it with the design and planning guide and the pipe-per-m² calculation guide before choosing a spacing or ordering materials.
Source notes
- Uponor UK, solid screed installation instructions discusses meander and bifilar patterns, perimeter routes, pipe crossings, wall clearances, bend care and keeping loops within the supplied design.
- REHAU, Radiant Heating Systems installation guide covers pipe layout principles, spacing, bends, circuit lengths and the importance of following the project design.
- Uponor UK, underfloor heating planning principles provides system-specific planning guidance and explains that pipe spacing and circuit sizing depend on the selected system and design conditions.
These documents are manufacturer guidance, not a substitute for the design, building requirements or installation instructions for the chosen UK system.
One useful email,
once a month.
New guides as they go live. Real cost data, not press releases. The occasional rumour from the industry that's actually worth knowing.
No sales pitches. No jargon. Unsubscribe in one click.