
Underfloor heating insulation does one simple job: it stops heat from travelling down into the floor and wasting energy. The pipe or cable warms the floor above it, and the insulation helps keep that heat moving upwards into the room.
Get the layer wrong and the system may still work, but it will use more energy, warm up more slowly or create uncomfortable hot spots. It can also restrict the flow temperature a heat pump needs, which matters a lot on a retrofit.
The right specification depends on the floor build-up, the heating system, the heat source and the available floor height. There isn't one insulation board thickness that suits every project.
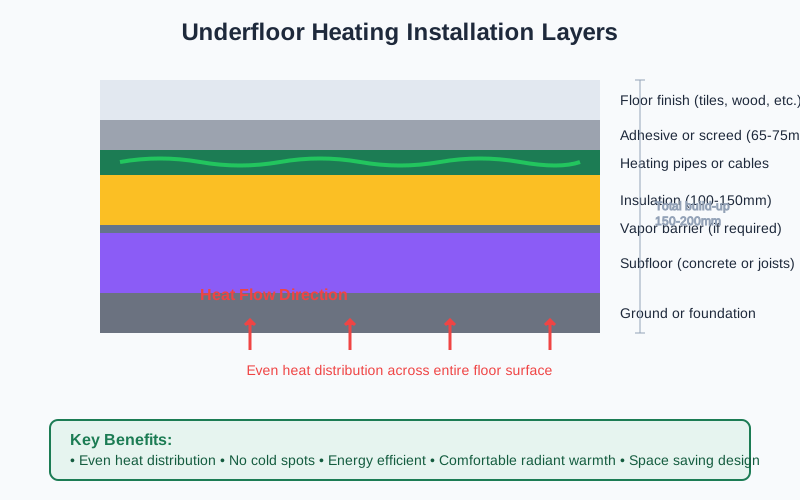
Why insulation is essential beneath UFH
Underfloor heating is designed to emit heat upwards. Heat will always take the easiest route, though. If the floor below the system is cold and poorly insulated, a significant share of the energy can travel downwards.
Good insulation does three things:
- reduces downward heat loss and improves system efficiency;
- helps the floor reach the designed surface temperature more evenly;
- keeps heat-pump and boiler systems within their intended operating range.
It can also protect the floor construction from sustained heat cycling. That matters when the insulation is part of a new screed floor, because the pipes and screed need to work as a considered assembly rather than as separate layers.
Insulation is especially important when the UFH is supplied by a heat pump. A low-temperature system loses much of its advantage if heat leaks into an unheated basement, ground or void. The building's heat-loss calculation should include the floor condition and the proposed insulation, not just its area.
For the wider design process, see underfloor heating design and planning.
Common insulation materials
Rigid foam boards
Extruded polystyrene, expanded polystyrene and polyurethane boards are common choices beneath wet UFH. They provide a stable base for pipework and can often be installed directly over a prepared concrete slab.
Check the product's declared thermal resistance or conductivity, its compressive strength and its suitability for the screed or floor finish above it. A board that is light enough for a roof may not be the right board for a floor carrying people, furniture or a wet screed.
Purpose-made UFH boards may include grooved or studded surfaces. The grooves hold the pipe, while the studs help set spacing and reduce pipe movement. A board with a vapour-resistant facing can also help manage moisture in a concrete-floor build-up, but the facing does not replace proper preparation and joint sealing.
Extruded polystyrene
XPS is widely recognised for low water absorption and good compressive strength. It's a sensible choice where the floor needs a robust, dimensionally stable base. It can be more expensive than basic EPS, so compare the whole build-up rather than the price of one board.
Expanded polystyrene
EPS is lighter and often cheaper. It can work well when the correct grade is specified and the floor is properly supported. The board must be protected from damage, water and movement during screeding.
Polyurethane and PIR boards
PIR and PUR products can offer high performance in relatively thin thicknesses. Thickness matters in retrofits, but a thin board with better thermal performance isn't automatically the right choice. Check compressive strength, the pipe groove design and compatibility with the screed system.
Mineral wool
Mineral wool is sometimes used in over-joist or timber-floor designs, especially where the assembly needs acoustic and fire performance as well as thermal insulation. It must be protected from moisture and compression. Wet pipe systems generally need a suitable pipe support and heat-spreader arrangement; mineral wool alone does not provide the same neat pipe route as a purpose-made grooved board.
Foil-faced insulation
Foil facing can improve the radiant component of a heated floor, but it should not be treated as a substitute for a continuous, correctly rated insulation layer. Focus on the board's thermal performance, density, moisture behaviour and installation method. Product data sheets matter more than a generic claim that a board is "foil backed".
Board thickness and placement
Insulation thickness is a design decision, not a standard box on a delivery list. The starting point is the heat-loss calculation and the required floor build-up. The designer then checks the insulation's resistance, the floor finish and the operating temperature.
A common new-build arrangement is:
- prepared structural slab or existing floor;
- vapour control or separation layer where required;
- continuous insulation boards;
- pipe or electric heating element;
- screed, tile adhesive or another specified floor finish.
For wet systems, the underfloor heating screed guide explains why the screed depth and insulation thickness need checking together. A thicker screed can add thermal mass, but it also changes the system's response and the total floor height.
The insulation must cover the heated floor area continuously. Gaps, broken joints and poorly filled edges create cold strips that can show as banding beneath tile or vinyl. Tape or seal joints as specified by the board manufacturer, and seal pipe penetrations and perimeter details carefully.
Don't cover the heating with an additional unapproved insulation layer. The assembly needs to be designed as a whole, especially where underfloor heating is paired with acoustic underlay, waterproofing, thick screed or a high-resistance floor finish.
What thickness do you actually need?
There are three separate questions to answer before choosing a board:
- What is the floor's existing heat loss and insulation condition?
- What heat output and surface temperature does the design require?
- How much floor height and structural capacity are available?
Those questions determine the answer. A project over a well-insulated ground slab may have more room for build-up than a loft conversion or upper-floor retrofit. A floor over a cold void may need more insulation than the same UFH layout above a heated room.
Ask for the insulation's thermal resistance in the design information. Record the board type, thickness, density, compressive strength, surface finish and fixing method. This gives the installer, screed supplier and floor-finisher one shared specification.
Edge insulation and perimeter details
The edge of a heated zone needs attention. Heat can spread horizontally through screed and towards adjoining rooms, walls and unheated spaces. Edge or perimeter insulation reduces this unwanted lateral flow.
Perimeter insulation may sit along the edge of the heated floor, around openings and at changes between heated and unheated zones. The required extent depends on the construction, zone layout and design. It must be compatible with the screed, tile adhesive and any waterproofing system.
Don't assume that a strip of thin foam is always suitable. A flexible or perforated edge profile may be needed where movement is expected. The profile should not interfere with the screed's bond, create an unsupported edge or block drainage arrangements.
Do specify insulation at thresholds, door openings and service penetrations. These are common places where a neat main floor area ends but heat can still find a path into an unheated space.
Suspended timber floors
A suspended timber floor needs a different approach from a solid concrete slab. The insulation must work with the joists, deck, ventilation and access conditions, not simply sit wherever there is a convenient flat surface.
Between-joist systems normally use insulation below the pipes or heat-spreader plates, with the arrangement designed to direct heat into the room. Over-joist systems use panels above the deck, so the existing boards must be stable and suitable for the added load. A thin electric mat is another option in selected rooms, but it still needs an appropriate substrate and floor build-up.
The suspended timber floor guide compares these routes and the access requirements. In a period property, ventilation, joist condition and ceiling insulation can be as important as the UFH design. Never seal a ventilated floor void without checking what the floor needs to do.
Existing concrete floors and retrofit constraints
Concrete gives you a solid base, but it doesn't automatically provide good thermal performance. An existing slab may be cold, bridged or connected to outside ground. The proposed insulation needs to address that condition without trapping damaging moisture.
On existing concrete, the choice may be a low-profile overlay, a thin electric system or a specialist approach such as milling pipe channels into the slab. Each has a different height, preparation and performance profile. Our existing concrete floor guide sets out the main retrofit options.
In a retrofit, the real constraints are often outside the room:
- limited floor-to-ceiling height;
- door and threshold clearances;
- the depth of the existing slab or screed;
- floor strength and the need to preserve services;
- moisture risk and the condition of the substrate;
- whether the floor is over a heated space, a void or external ground.
If there is no room for conventional boards, ask the designer to calculate the options. A specialist overlay panel, an electric system or a carefully designed in-cut wet system may be more sensible than forcing a full-height standard build-up.
Common insulation mistakes
Leaving the board unprotected
Foot traffic, dropped tools and screed work can damage boards. Protect the surface as specified and keep the area clean and stable until the next layer is installed.
Leaving joints open
Insulation is a continuous layer. Open joints create thermal bridges and can lead to uneven floor temperatures.
Using the wrong board strength
A product's thermal performance matters, but so does its ability to carry the floor. Check the declared load rating and installation requirements.
Insulating over an unresolved damp problem
Damp movement or trapped moisture can damage boards, screed and floor finishes. Identify and remediate the cause before covering the floor.
Confusing pipe grooves with insulation
A groove holds the pipe. It does not prove that the panel has adequate thermal resistance. Check the full board specification.
Ignoring the edge
A well-insulated centre with an open perimeter is not a complete assembly. Edge details and service penetrations need to be included in the design.
Letting the screed dictate the design
The available screed depth can influence the design, but it shouldn't dictate unsafe insulation or a flow temperature the system cannot achieve.
How to specify insulation with a designer
Start the conversation before the builder orders materials. Ask for a floor build-up drawing that shows every layer, including the structural slab, insulation, pipe or cable, screed, adhesive and finish.
The drawing should state:
- the insulation material and manufacturer or equivalent product;
- the board thickness and declared thermal resistance;
- the board's compressive strength and fixing method;
- the position of pipework, electric elements and floor sensor;
- perimeter and edge insulation details;
- waterproofing or moisture-control layers;
- the finished floor level and available ceiling height;
- the screed type and depth for wet systems;
- the test and commissioning requirements.
A competent underfloor heating designer can then use the floor construction alongside the room's heat loss, desired temperature and heat source. They can also show how the specified insulation changes the required heat output and flow temperature.
If you're planning the work, start with the installation guide and use the design and planning article to prepare a proper brief for a supplier or installer. For a concrete floor, check the existing concrete guidance. For timber, the suspended timber guide covers the structural and access questions.
Finally, check the insulation specification against the applicable UK building requirements and the heating system manufacturer's installation instructions. The government publishes guidance on energy efficiency and floor insulation in Approved Document L, Conservation of fuel and power. A heating designer should apply the relevant requirements to the actual building rather than treating the document as a universal board thickness rule.
Insulation is not a place to guess. Specify the floor, specify the heat source and let the design determine the layer that belongs between them.
One useful email,
once a month.
New guides as they go live. Real cost data, not press releases. The occasional rumour from the industry that's actually worth knowing.
No sales pitches. No jargon. Unsubscribe in one click.